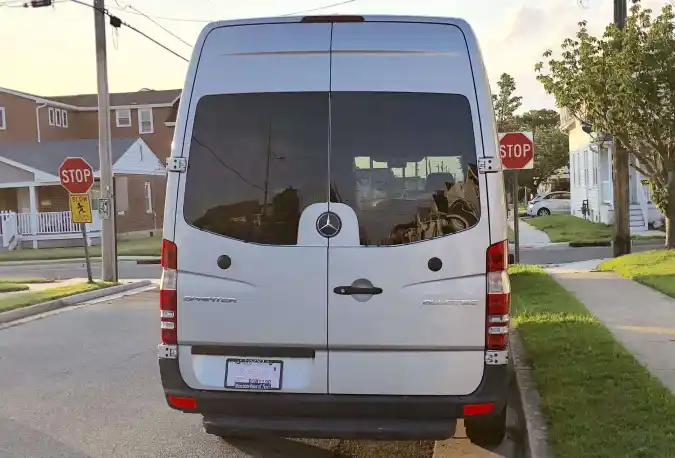
Back Door Windows - Ep 1 | Mercedes Sprinter

Overall this project was nerve-racking but fun! It took us about 4-5 hours from start to finish and that includes the time spent worrying about capturing the content on camera. We definitely think you can install the windows yourself if you have the right tools! But if you don’t feel comfortable consider getting it installed professionally. Tools Needed To Install Back Door Windows Before we get into each step of the back door window install, below are tools used for a back door window installation on a Mercedes Sprinter Van (this applies to the Dodge Sprinter Van and Freightliner Sprinter Vans as well). Right Back Door Window: https://amzn.to/2KMvvLj Left Back Door Window: https://amzn.to/2KBkKwM 3M Window Weld Urethane (2 Tubes): https://amzn.to/2N6M9by Rubber Edge Trim (20 Feet): https://amzn.to/2Z6qlz1 10 Pack of Wool Daubers: https://amzn.to/2KCobTK 3M 08682 Single Step Primer: https://amzn.to/2KCOhWR Rust-Oleum Paint: https://amzn.to/31AX94K Window Glass Suction Holders (We got our at Harbor Freight but these should do the trick): https://amzn.to/2Hb7tZo C-Clamps: https://amzn.to/2Zau2Ux Painter’s Tape: https://amzn.to/2HbIk0W Bosch Jigsaw Used: https://amzn.to/2N7QHOE Bosch Thin Metal Jigsaw Blades: https://amzn.to/2z390MF Grinding Drill Bit: https://amzn.to/2ZbOcNW Could use a Metal Filer as well: https://amzn.to/2ZbawqP


Like Save to your Favorites Comment

Mod Specifications

Mod Category

Window

Total Time

About a day

Size

Medium Mod

Difficulty

Hard

Total Cost

RV Details

Type of RV

Custom

Make

Mercedes

Series

Sprinter

Model

Year

2015

How to | Back Door Windows - Ep 1 - Mercedes Sprinter

View helpful step by step instructions on how to complete the “Back Door Windows - Ep 1” mod on a 2015 Mercedes Sprinter along with the products and tools that you’ll need to effectively accomplish the job. This Window mod was considered hard to do and took about a day to complete.

Products You'll Need

How to video

How-To Step by Step Guide

Below is a step by step guide on how to install back door glue on (urethane adhesive) windows on your Mercedes Sprinter Van. We think this tutorial is helpful for other van builds as well, like a Ford Transit or Dodge Promaster.

Step 1: Create the outline of the window

If you’re using a jigsaw to cut the window, (which we highly recommend) you are going to need to cut the window from the outside. You need to use a hammer and a screwdriver (or something similar) to make the outline.

You can see the dots from the impact of the screwdriver.

Simply trace the outline of the window from the inside making small dents into the door.

Step 2: Trace the outline of the window imprint and apply masking/painters tape

Once you created your outline with the small dents in the door, use a dry erase marker and trace the outline of the window.


Apply masking/painters tape around the traced cutout to protect the paint

We used masking/painters tape to tape around the window before we made our cut. This ensured we will not scratch the paint from the jigsaw when cutting through the door. For extra precaution, tape the jigsaw as well to provide an additional layer of protection.

Step 3: Drill a hole into the door

Before you make your cut you need to drill a hole into the door of your van with a hole large enough to fit a jigsaw blade through it.

Step 4: Cut out the traced outline of the window in the door

Once your hole is drilled it’s time to make your cut! We use the Bosch Thin Metal Jigsaw Blades to make our cut, which worked great! When you’re cut is almost finished, use masking tape to tape the cutout to the door to prevent it from falling and scratching the door.

Step 5: File down the raw metal and smooth out the edges

After you’ve made your cut, the edges will be sharp and jagged, take a metal filer or a grinding bit to smooth out the edges.

Step 6: Paint the raw metal

Once the metal is filed down, you want to prevent rust and protect your vehicle. To do this, paint the raw metal with oil-based paint. We used rust-oleum paint which works great!

Wait an hour or so to let the paint dry.

Step 7: Apply the rubber edge trim around the window cutout

After the paint dries, apply the rubber edge trim around the window. We purchased the 25-foot rubber edge trim to ensure we had extra in case we made any mistakes.

For the best water seal protection, make your seam at the bottom of the window!

Step 8: Prep the window for 3M Primer

The next step of the installation of the back door windows on a Mercedes Sprinter Van is to prep the window for 3M Primer. Use a scotch sponge (the dark green side) to scuff the window and remove any polish off the paint. This will help the primer stick to the window and create a better water seal.

Added tip, you can buff the window as well for better adhesion.

After you buffed the door, clean off the dust and dirt off the door with glass cleaner.

Step 9: Apply the 3M Primer

Once your door is buffed it’s time to apply the 3M Primer. The primer helps the Urethane adhesive stick to the door and create a strong water-seal. You do not want to skip this step!

We used a wool swab and it was really easy to apply the primer. Make sure you do not spill the primer since it is difficult to clean!

Let the primer dry before moving to the next step!

Step 10: Apply the Urethane adhesive

Once the primer dries it’s time to apply the urethane adhesive. We used 3M Window Weld Urethane Adhesive and highly recommend it! Use a caulk gun to apply the urethane and adhesive and apply it directly over the primer on the door.

Once the urethane is applied you have at most, 10-15 minutes to stick the window glass to the door.

Make sure your bead of Urethane is consistent and doesn’t break when you apply it. The bead should be 1/2 inch to 3/4ths an inch thick. In terms of how much you should buy, we used about 3/4th’s of the tube of 3M Window Weld for each window, so two tubes.

Step 11: Stick the window glass to the door!

The last step! Stick the window glass to both doors and make sure it lines up properly! We used two handle suction cups to hold the glass and help us push it against the door.

Once we got the window in place, we put spacers between the bottom of the door and the glass, taped the window to the top of the door, and utilize c-clamps to secure the glass against the door with a good amount of pressure.


The finished product (you can still see the spacers below the glass but overall looks great!

After an hour we removed the c-clamps the tape and closed the van doors, and admired our work! The next day we sprayed the doors down with water to check for leaks! We didn’t have any leaks!

Like Save to your Favorites Comment

Inspiration from Remarkable Renovators

rain2shine ventures
rain2shine ventures

Examples of Renovations

Portable Stove For Indoor/Outdoor ConvenienceBright and Fun Kitchen: 2000 GMC Savana VanAffordable Kitchen Upgrade: 2018 Prime Time Crusader LiteSimple Yet Beautiful Kitchen: 2017 Dodge Ram ProMaster Sprinter Van

Follow them on Social Media

Discuss Mod