MAXXFAN Deluxe Roof Vent - Ep 3 | Mercedes Sprinter
Posted By
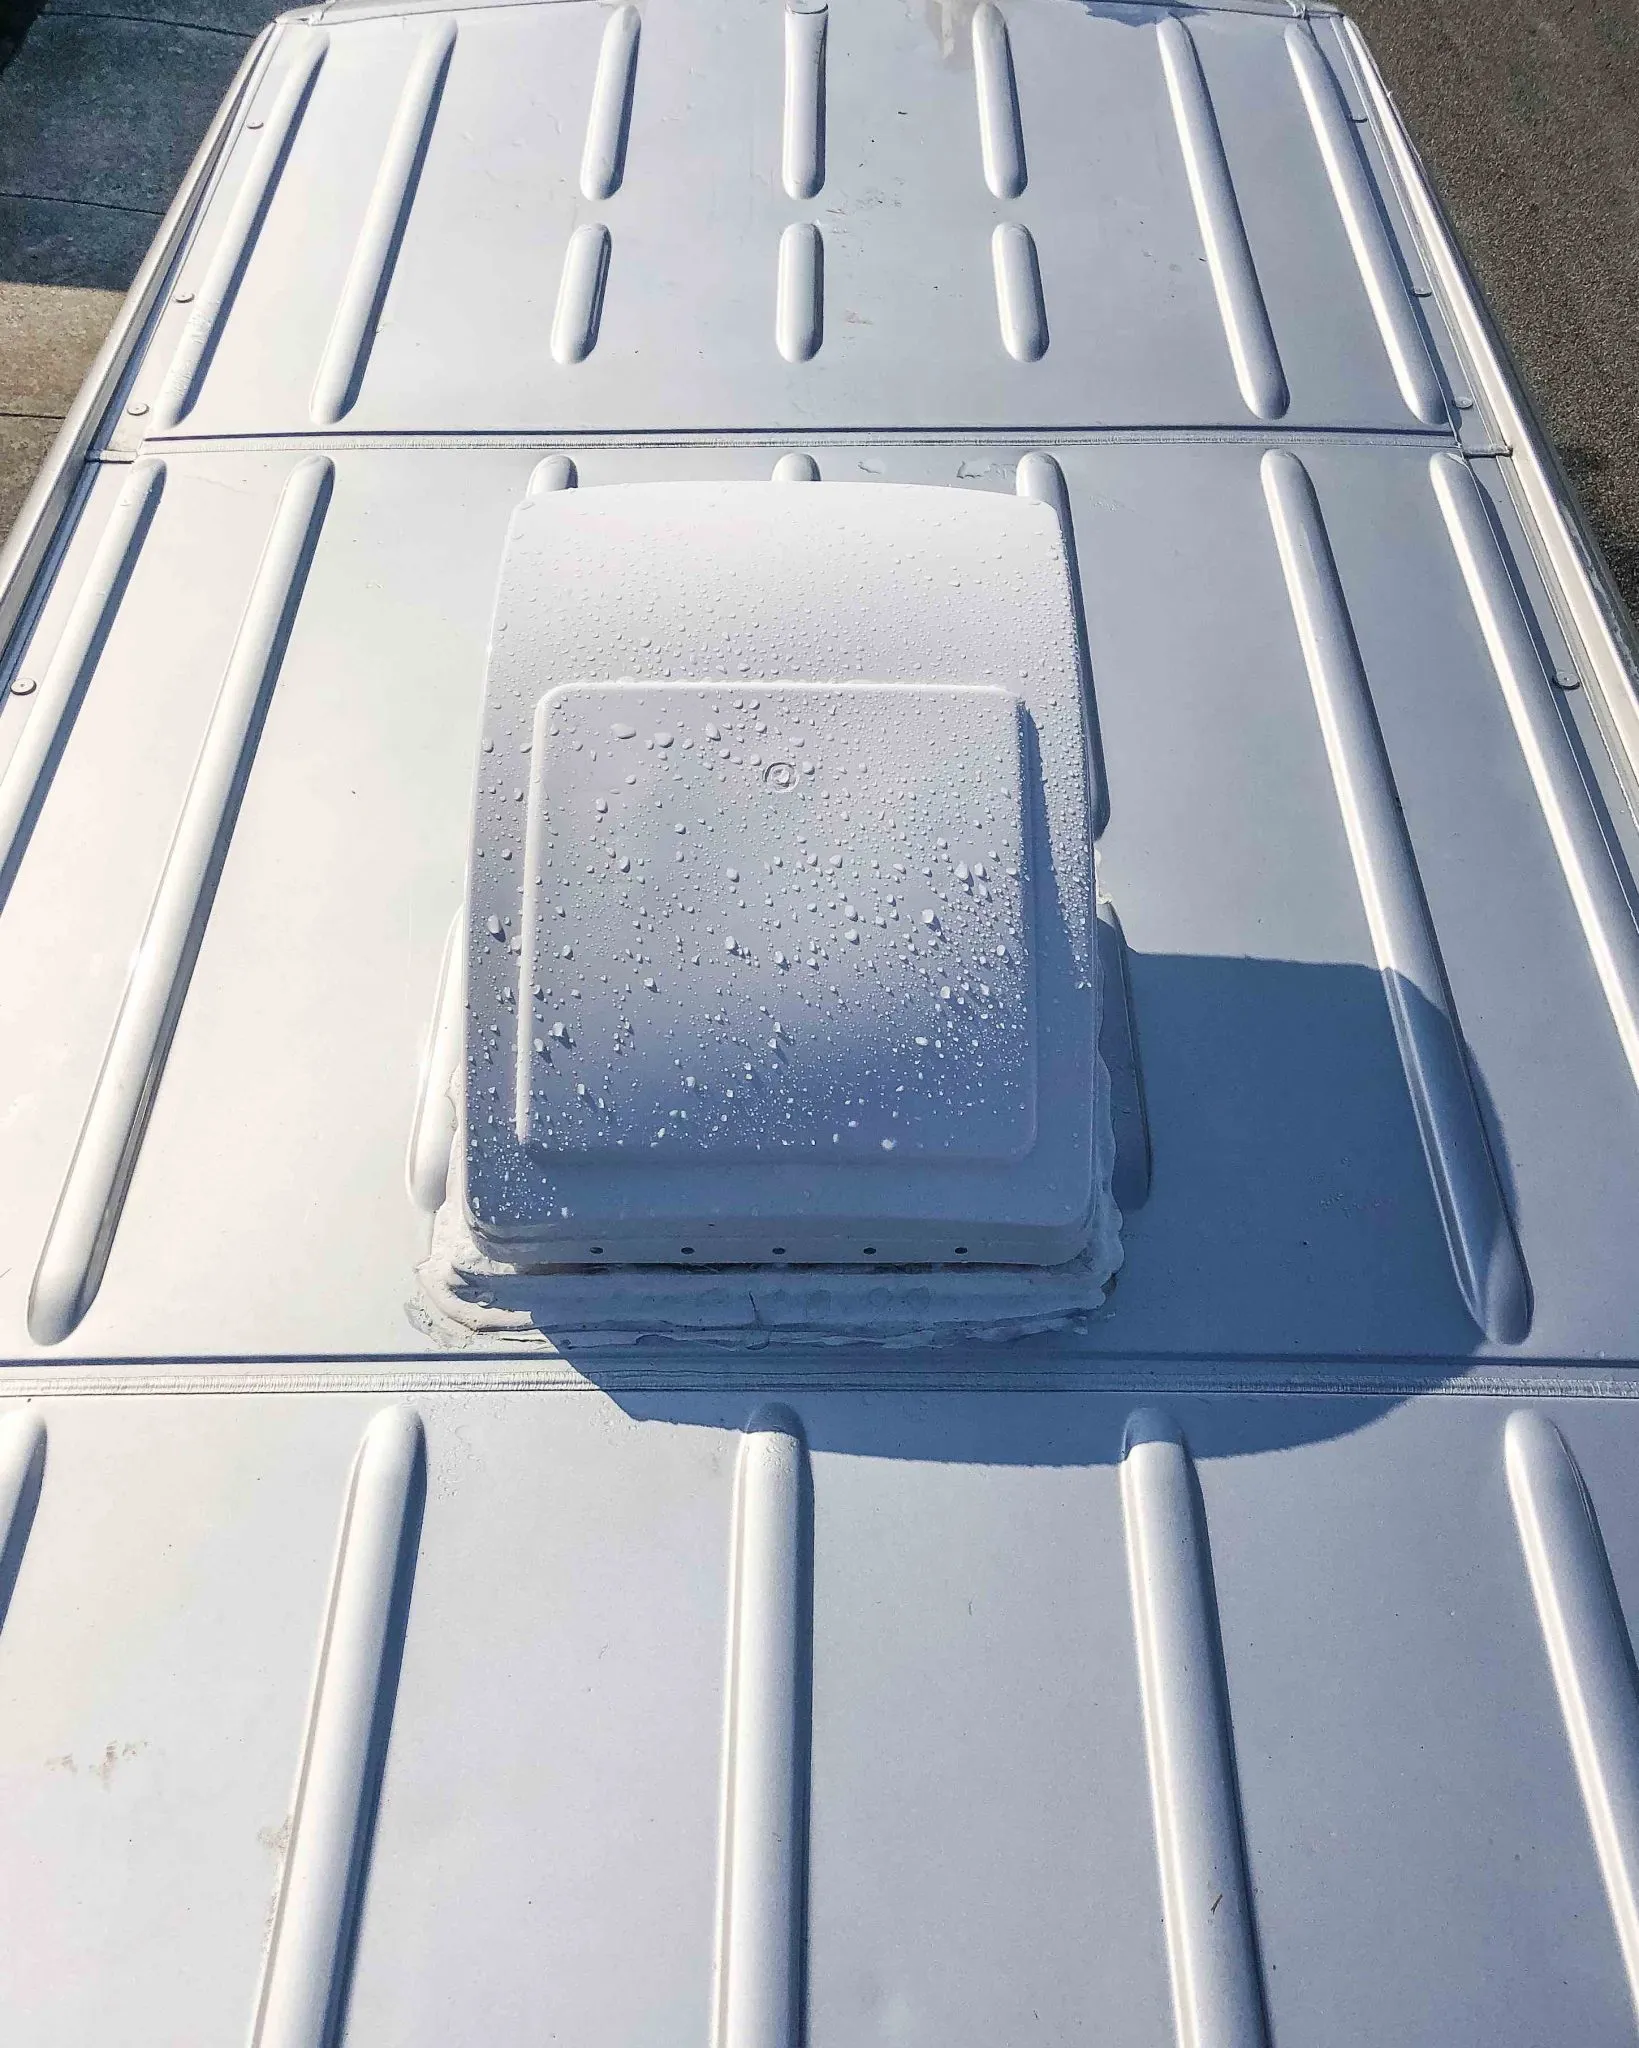
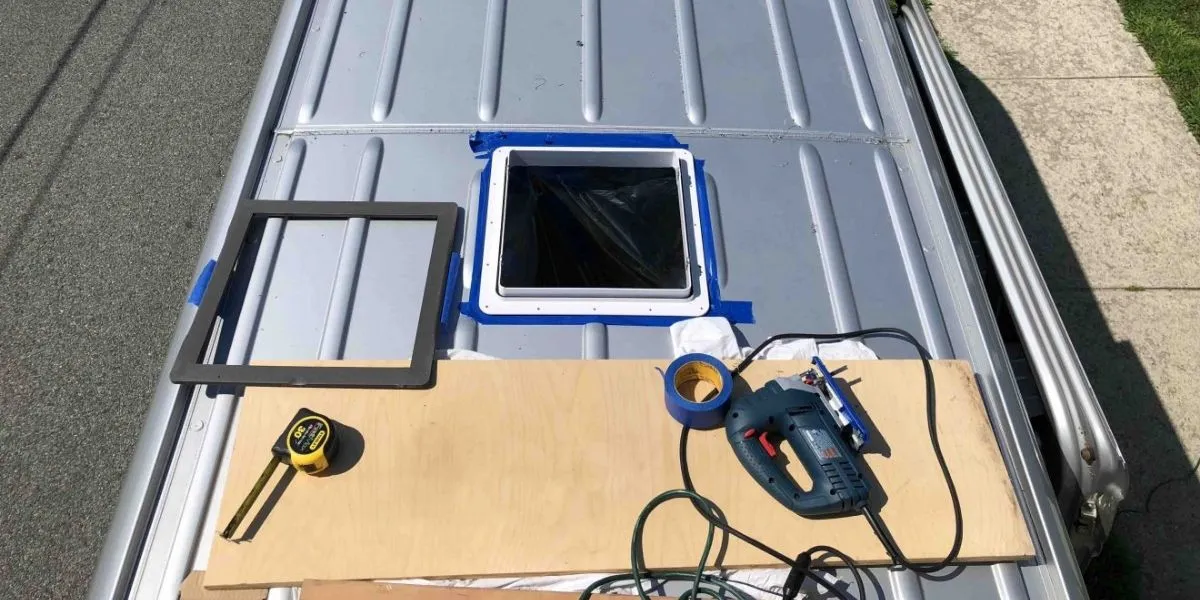
Overall this project isn’t bad and you can do it! It took me about 5 hours from start to finish and that includes the time spent worrying about capturing the content on camera. I did this alone if Taylor was able to help with this project I am sure I would have completed it faster. We definitely think you can install the MaxxFan Deluxe yourself if you have the right tools! But if you don’t feel comfortable consider getting it installed professionally. Tools Needed To Install A MaxxFan Deluxe Roof Fan Before we get into each step of the MaxxFan Deluxe Roof Vent Fan install, below are tools we used for a MaxxFan Deluxe Roof Vent Fan installation on a Mercedes Sprinter Van (this applies any van). MaxxFan Deluxe: https://amzn.to/31WgfTc MaxxFan Deluxe Adapter: https://rover.ebay.com/rover/1/711-53… This adapter is optional but highly recommended. Since the roof of the van is not 100% flat, the adapter meets the concave of the roof and provides a flat surface for the fan’s ****** to rest on. Dicor Roof Sealant Self Leveling Caulk: https://amzn.to/3220tGn Butyl Tape: https://amzn.to/2UcsIiP 3M Marine Adhesive Sealant Fast Cure 4200: https://amzn.to/320aQdC Rust-Oleum Paint: https://amzn.to/31AX94K C-Clamps: https://amzn.to/2Zau2Ux Painter’s Tape: https://amzn.to/2HbIk0W Wooden Foam Brush: https://amzn.to/33XPMGB Bosch Jigsaw Used: https://amzn.to/2N7QHOE Bosch Thin Metal Jigsaw Blades: https://amzn.to/2z390MF
0 Likes
Mod Specifications
Mod Category
RoofTotal Time
A few hoursSize
Medium ModDifficulty
MediumTotal Cost
RV Details
Type of RV
CustomMake
MercedesSeries
SprinterModel
Year
2015How to | MAXXFAN Deluxe Roof Vent - Ep 3 - Mercedes Sprinter
View helpful step by step instructions on how to complete the “MAXXFAN Deluxe Roof Vent - Ep 3” mod on a 2015 Mercedes Sprinter along with the products and tools that you’ll need to effectively accomplish the job. This Roof mod was considered medium to do and took a few hours to complete.
How to video
How-To Step by Step Guide
Below is a step by step guide on how to install the MaxxFan Deluxe Roof Vent Fan on your Mercedes Sprinter Van. We think this tutorial is helpful for other van builds as well.
Step 1: Determine the location you plan to cut
The first thing you should do before you cut into your ceiling/roof is to determine the best location for your build. We strategically placed our MaxxFan Deluxe towards the back of the van between our bed and kitchen.
Step 2: Trace your cut
Once you determine your location it’s time to trace the outline of the flange (the white piece of plastic that you screw the body of the fan too) in preparation for your cut. I used the flange of the van to trace the outline with a magic marker.
Step 3: Tape the van ceiling around the traced outline
Before you make your cut you want to tape (with masking tape) around the outside of the traced outline to ensure you do not scratch the roof of the van when making your cut.
Step 4: Cut the roof of your van
After you taped everything down you are ready to make your cut.
In order to use your jigsaw to cut the hole for the fan, drill a hole (with a large drill bit to fit the jigsaw blade through, I used 3/4th’s) into each corner of your outline. This will allow for four straight cuts instead of trying to make 90-degree turns.
Step 5: File down the raw metal and smooth out the edges
After you’ve made your cut, the edges of the metal will be sharp and jagged. To smooth the edges out, use a metal filer or a grinding bit.
Step 6: Paint the raw metal
Once the metal is filed down, you want to prevent rust and protect your vehicle. To do this, paint the raw metal with oil-based paint. We used rust-oleum paint which works great!
Wait an hour or so to let the paint dry.
Step 7: Prep the surrounding area of the cutout for the adhesive
Use a scotch sponge (the dark green side) to scuff the metal around the cutout of the roof. This will help the adhesive for the adapter to stick to the metal.
Step 8: Apply 3M Adhesive to MaxxFan Deluxe Adapter
Once your cutout is properly scuffed down with a scotch sponge and cleaned with glass cleaner it’s time to apply the MaxxFan Adapter using 3M Marine Adhesive. Again, this isn’t required for the install, but it’s highly recommended. Since the roof of the van is curved, the adapter helps provide a level platform for the MaxxFan Deluxe’s flange to rest on, ultimately providing a better water-seal.
The maker of the adapter recommends three 1/8th inch beads of adhesive on each side of the adapter. Once you have the adhesive on the adapter, press the adapter into place on the roof of your van. Then apply pressure to the van and attach a few c-clamps to keep strong pressure on the adapter.
Step 9: Cut the aluminum strips and drill the holes
While you’re waiting for the adhesive to stick to the adapter, it’s time to cut your aluminum strips. Note you can do this ahead of time, if you get the fan in advance before you start the project.
You should cut four aluminum strips, two strips 16.5 inches long, and the other two roughly 14 inches long. Then use a 3/16th’s drill bit to drill your holes into the aluminum strips.
IMPORTANT: Do NOT use a 3/16th’s drill bit for the roof of your fan since it is too thick for the screws.

Step 10: Apply butyl tape to the MaxxFan Deluxe flange
Once you have your aluminum cut and the holes drilled it’s time to get the flange ready for install. First, you need to add butyl tape around the flange that will help it stick to the adapter.
Make sure you have your seam at the back of the flange (facing the rear of your vehicle). You want the seam in the back/rear because if you’re driving and it’s raining you will have rain/water hitting the front of the flange first with the most force.
The butyl tape’s seam will have the weakest water seal in comparison to the rest of the flange so that’s why we placed the seam to the backside of the flange.
Step 11: Apply the flange to the adapter on the van
The butyl tape is now stuck to the flange and it’s now time to stick the flange to the adapter on the roof. Make sure you line up the flange and make sure it’s straight and aligned properly.
Note: The sides with the metal clips on the flange should face the side of your van!!!
Step 12: Drill holes into the adapter and the roof of the van
After you stick the flange to the adapter and roof, drill the holes into the roof and adapter with a 1/8th’s drill bit.
Step 13: Screw the flange into the roof
Using the screws provided, screw the aluminum, the flange, and the adapter all to the roof at once.
Step 14: Apply the self-leveling lap sealant
Once your flange is properly secured to the roof via the screws it’s time to apply the self-leveling lap sealant. Make sure you clean off any dirt or metal shavings from the area before you apply the sealant.
Step 15: Attach the MaxxFan Deluxe Fan to the flange
You’re almost done the installation! Next, attach the fan to the flange via the four screws. In order to do this make sure you turn the mechanical gear to open up the fan. If the screw holes don’t line up perfectly, simply remove the fan and lift the metal clips up on the flange, then re-attach the fan. There should be enough room to fit the screw into the place and tighten down the fan.
Step 16: Test your water seal by spraying it down with water
After 8 hours of drying, test your water seal by spraying it down with water. You can wait a full 24 hours if you prefer but we tested after 8 hours and the seal was watertight!
If you find leaks, apply more lap sealant (make sure you cover over the screws as well) and you should be good to go!